Model making is a crucial component of being a designer of three-dimensional objects. These are completed projects that hone my skill and process with model making. Through these projects I have learned the value in designing seamlessly between two dimensions and three. It allows one to better foresee how a user interacts with the object, what problems will arise later in the process of making a final version, and how two-dimensional concepts will hold up in space.

Clockwise from top-left: Three intersecting spheres (8', 6', 4'), two 4"x4" cubes, accurate to 1/64th of an inch.
Materials: Bristol board, foam spheres, museum board.
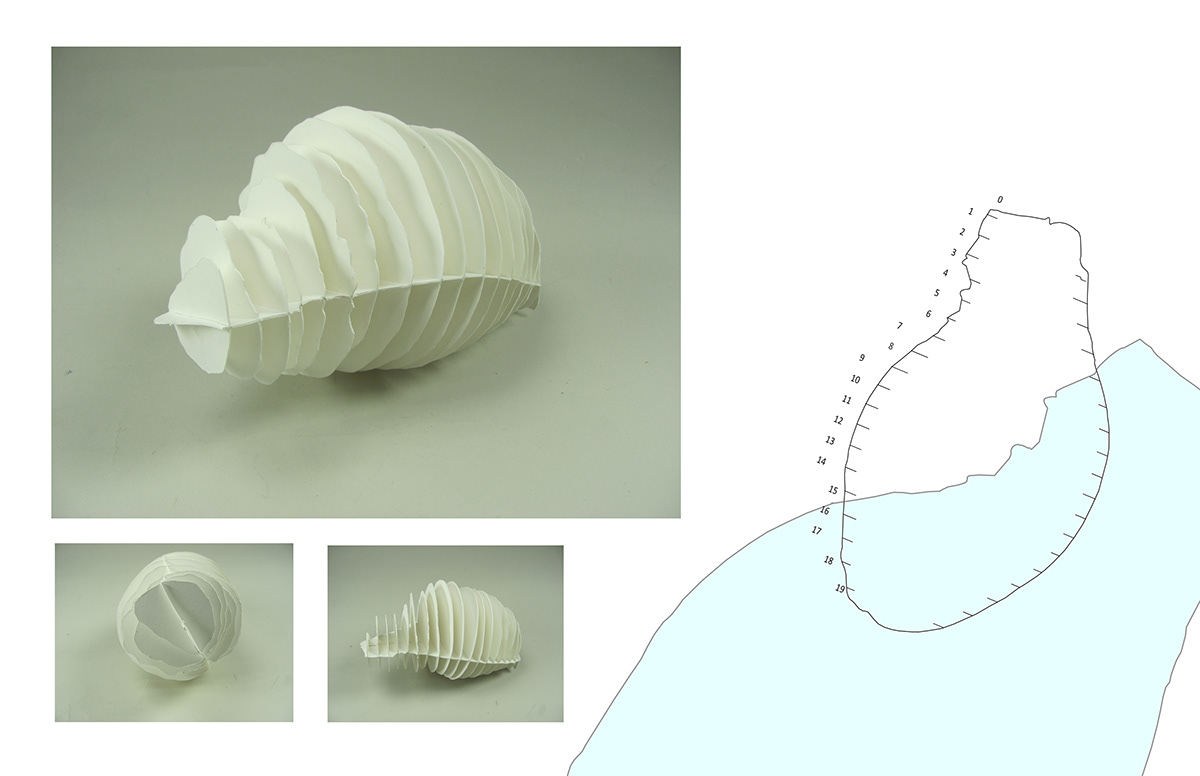
I created this fin loft model as a way to understand creation of three-dimensional form through two-dimentional planes.
Clockwise from top left: Final model, profile used to cut vegetable.
Meterials: Bristol board
I designed this model of a bike derailer to practice simplifying a complicated mechanism. A bike derailleur is used to change gears on bike. It does this by turning the tension from a cable into a lateral movement. I thought the best way to illustrate this would be through elimiting the brake cable, and the tensioning member, so that the user could focus on the gear-changing movement.

Counter-clockwise from top left: Board illustrating how a bike derailleur works, sketch-model for my final model, final model in the two positions.
Materials: Bristol board, maple, styrene, aluminum, spring steel, string, small dc motor, alligator clips, Wolf-pack battery pack, small metal switch.
This is a short video of my final model working. The motor allows the user to only focus on moving the string from one position to the next by pulling the apparatus to the left.
A large part of my group's process for the zipper table included the creation of sketch models and two-dimensional representations of how the model would scale. This portion of the design process allowed us to predict how the modules could work together in space. The model making process also allowed us to foresee troublesome areas for the contruction of the final prduct.

Above: Model of the zipper table.
Below: Orthographics explaining how the table will scale.
Materials: 1/8" foam core.
As an ecercise in iterative designing, and designing under tight constraints, I designed these cars that were powered by the spring in a mousetrap. Each car was able to travel 45 feet.

This first design has a moustrap placed within the cheese, which is weighted. By attatching a string from the lever of the mousetrap to the axis, which is attatched to the wheels, the car is propelled forward. Since the trap is weighted, the wheels have less intertia than the trap, so the wheels rotate while the cheese does not.
Materials: plexiglass, rubberbands, PVC foam, victor mousetrap, acryla paint.

Final cheese car.

Final cheese car.

My second design was inspired by Buckminster Fuller and Kenneth Snelson's tensegrity structures. By placing conventional propulsion methods on a tensegrity frame it allowed the car to smoothly glide over imperfections in the track and it also allowed me to adjust the axis mid-contest.
Materials: Plexiglass, rubberbands, wooden dowels, victor mousetrap, bungee cord, tape, 1/8 inch steel rod.

Final tensegrity car.

Final tensegrity car.

The project culminated in a race among the years, which allowed us to see how our classmates' cars performed in different ways.
Photo by Winston Cuevas

